Install Motion Path — it’s free → See the product page
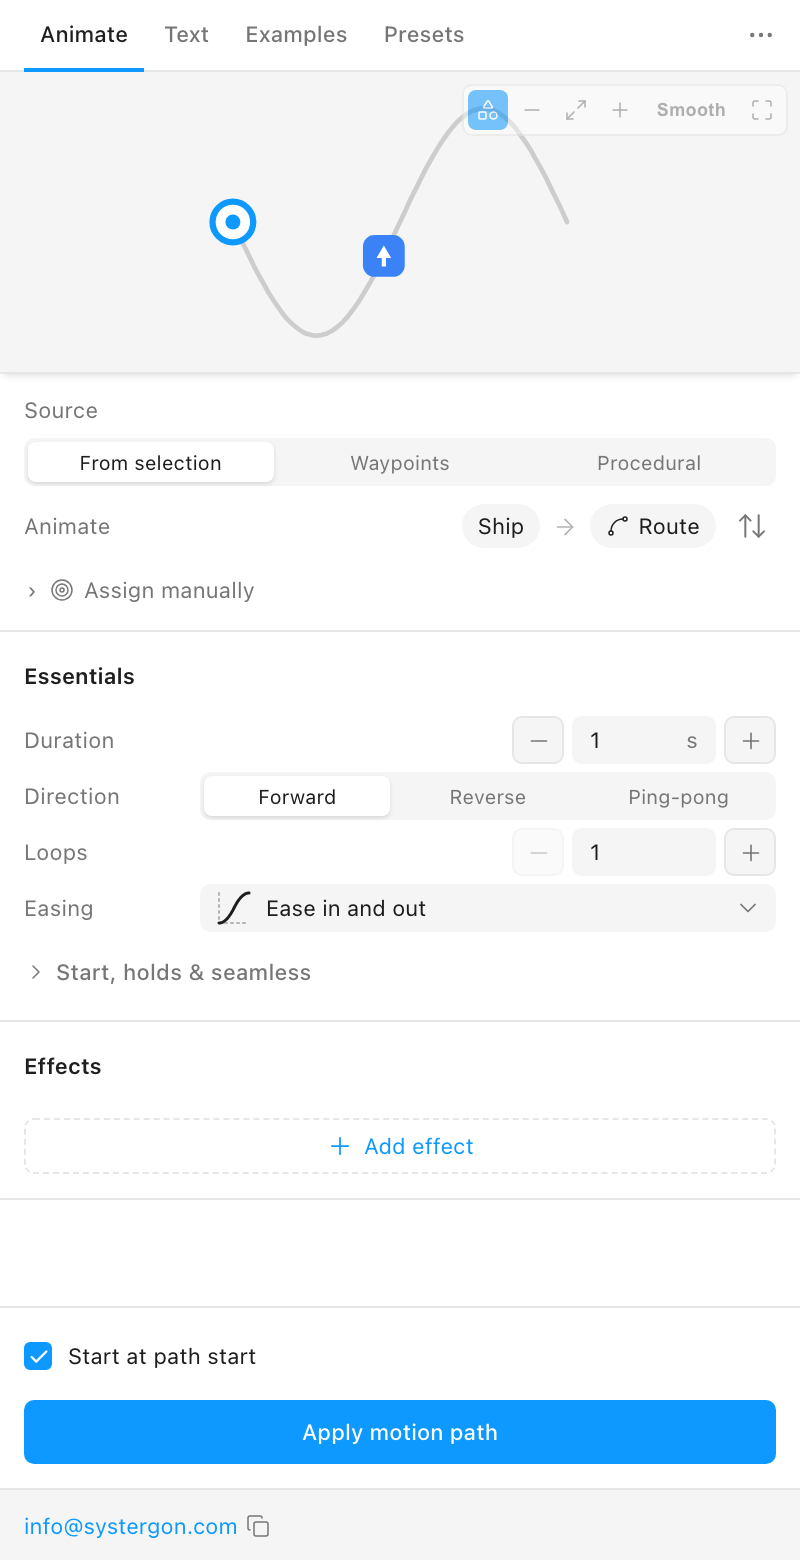
The short answer: animate your layer with Motion Path, press Apply motion path, then open the … menu in the plugin titlebar and choose Export video. Pick MP4, GIF or WebM, set a frame rate and a size, and press Export. Figma encodes the file itself — this is not a screen recording and not a re-render, so what downloads is canvas playback.
That last point is the one worth internalising, because it changes what the file is worth. Everything below is the detail: the encoder, the rule about frames, every field in the panel, the maths that decides what your clip weighs, and how to choose between the three formats.
The old workflow was miserable and everyone did it anyway: play the prototype, screen-record the canvas, crop the recording, convert it, and hope the timing survived. Three lossy steps between the design and the artefact, plus whatever your recorder decided about frame pacing.
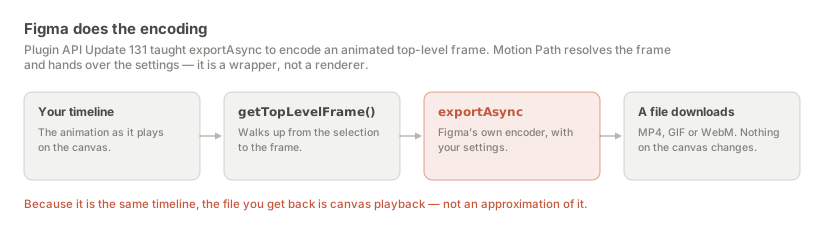
Figma itself grew a video encoder in Plugin API Update 131 (16 July 2026), taught to exportAsync an animated top-level frame. Motion Path hands your animation straight to it and pipes the returned bytes to a download.
The plugin is a wrapper, not a renderer. It resolves which frame to encode, validates the settings against what the API accepts, and gets out of the way. Because Figma encodes the same timeline it plays, there is no drift between what you approved in the canvas and what you sent to the channel.
Export reads the applied timeline. The live preview in the panel is a simulation and writes nothing to the canvas, so an export taken before you press Apply motion path records a frame in which nothing moves.
Figma encodes a top-level frame: a frame sitting directly on a page. Not a nested frame, and not a layer that merely has keyframes on it. Both of those are rejected by the API rather than silently producing something odd.
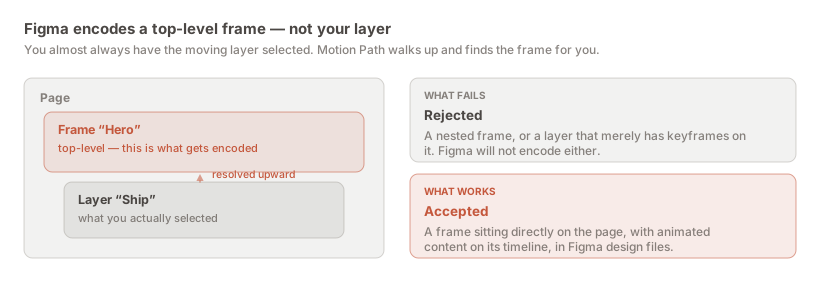
In practice you never have the frame selected — you have the layer that moves, because that is what you were just animating. So the plugin walks up from your selection and finds the frame for you. Select either and it works.
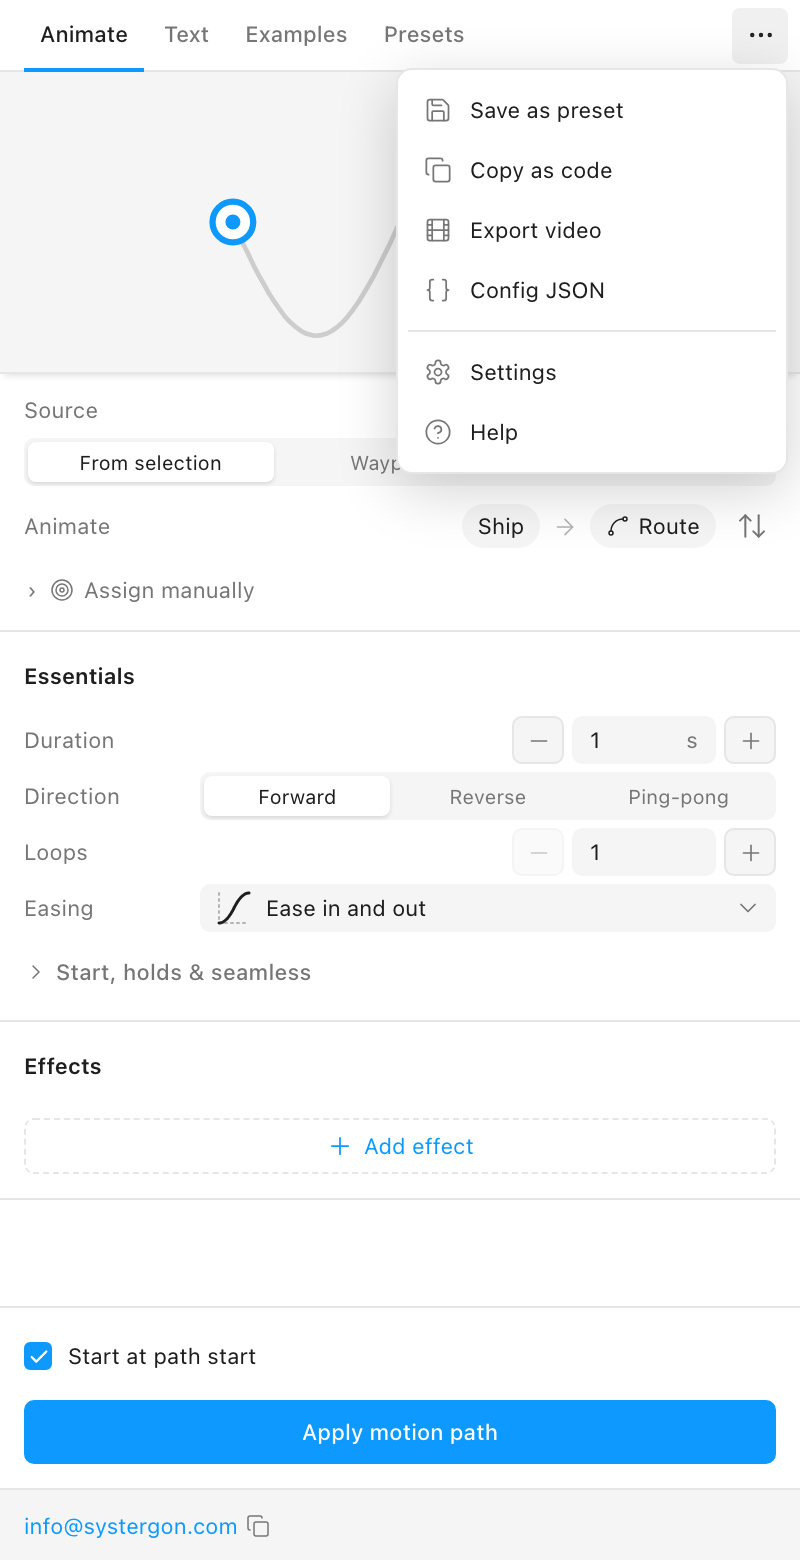
Click … in the titlebar and choose Export video, the third item.
The whole flow, held a beat per step:
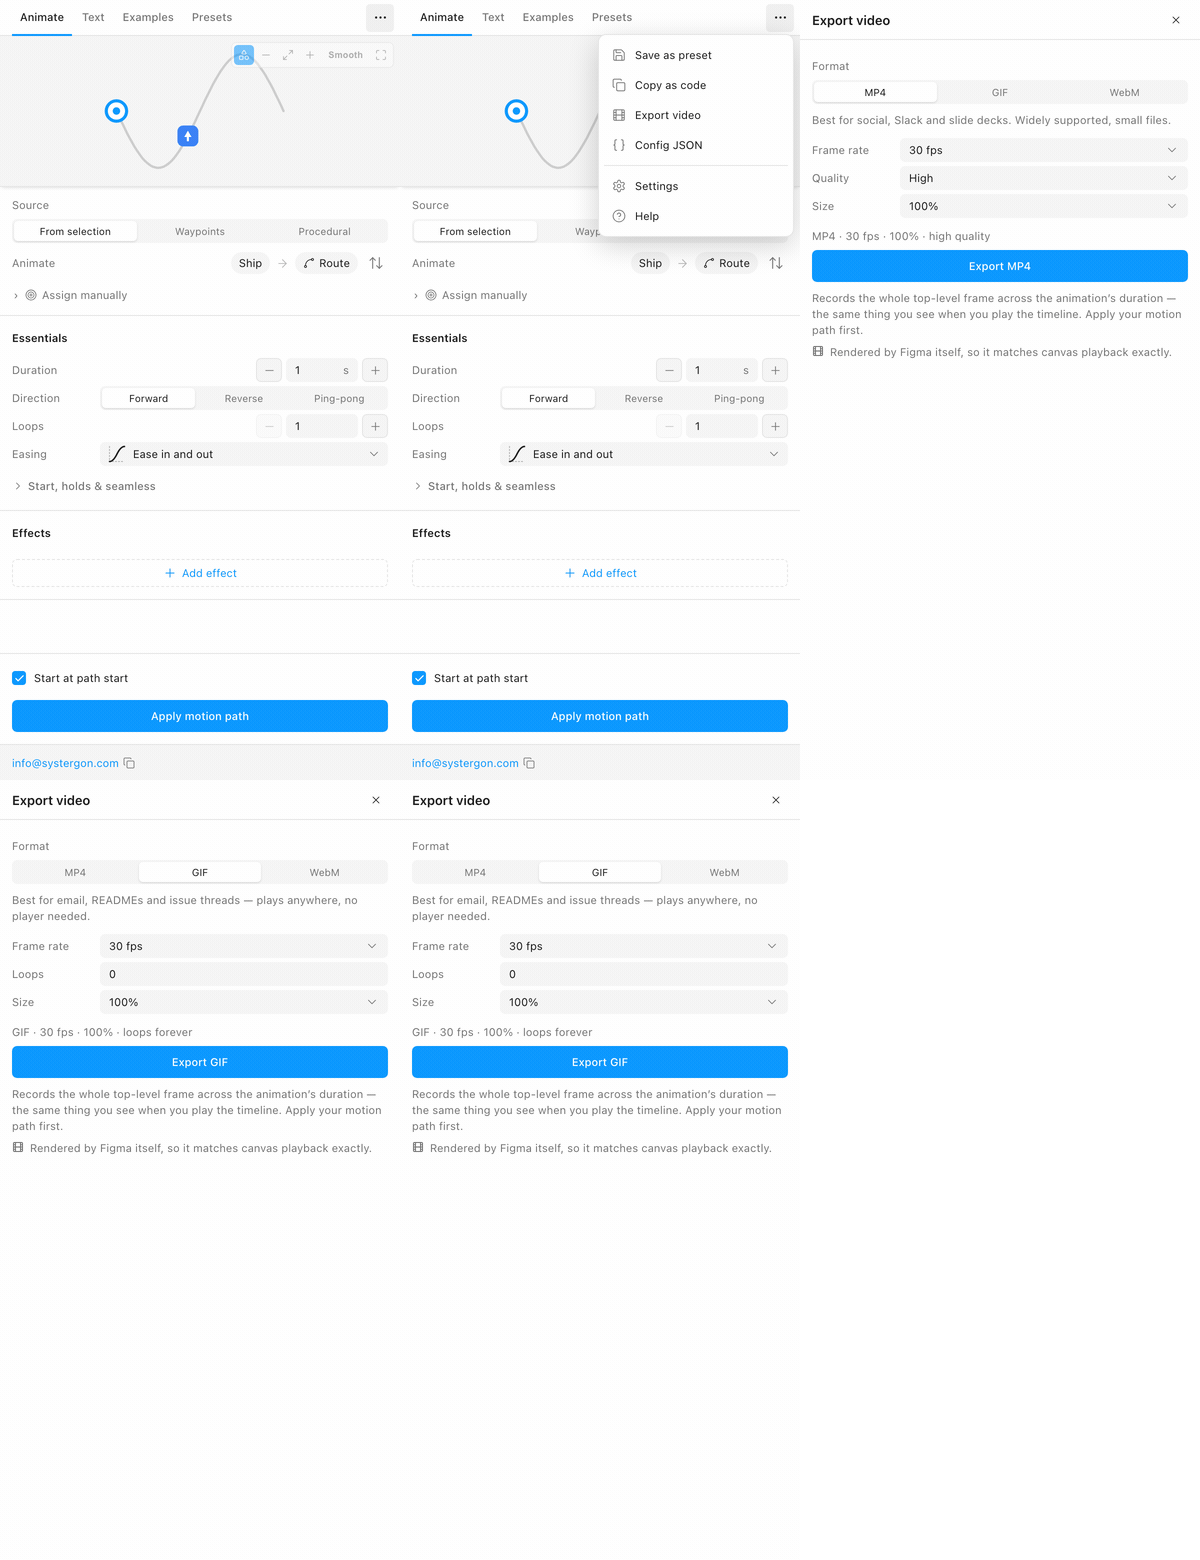
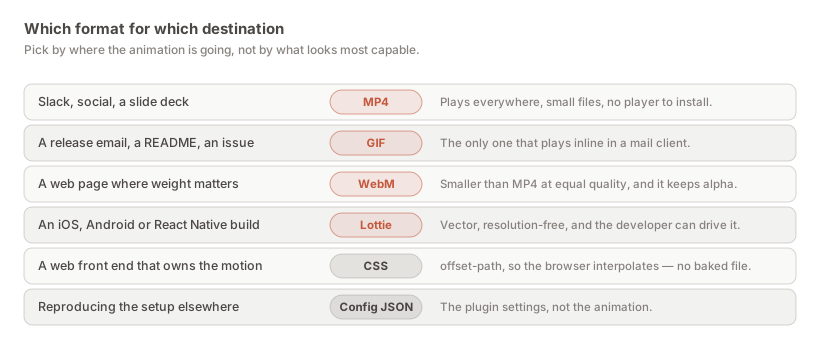
Three formats, and the panel adapts to each. That adaptation is not cosmetic: MP4 and WebM have a quality preset, GIF does not — it has a loop count instead, because that is the knob GIF actually has.
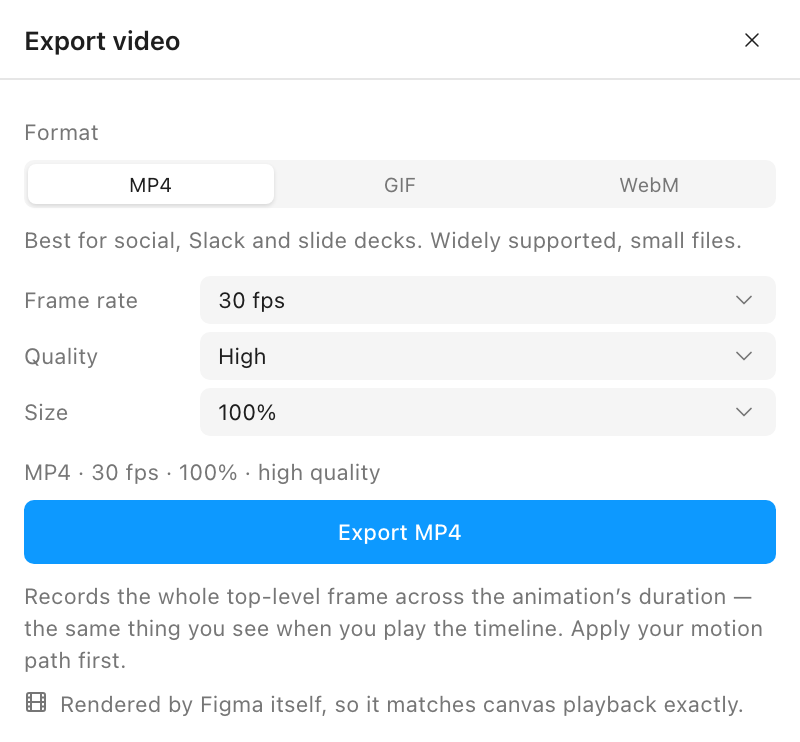
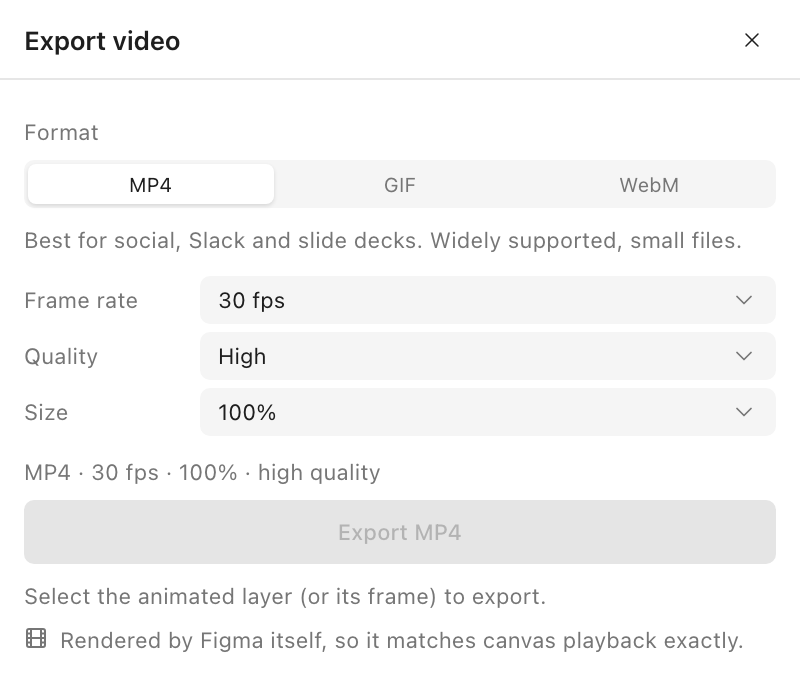
MP4 — best for social, Slack and slide decks. Widely supported, small files. This is the default and it is the right default; if you are not sure, this is the answer. Detail in the MP4 section.
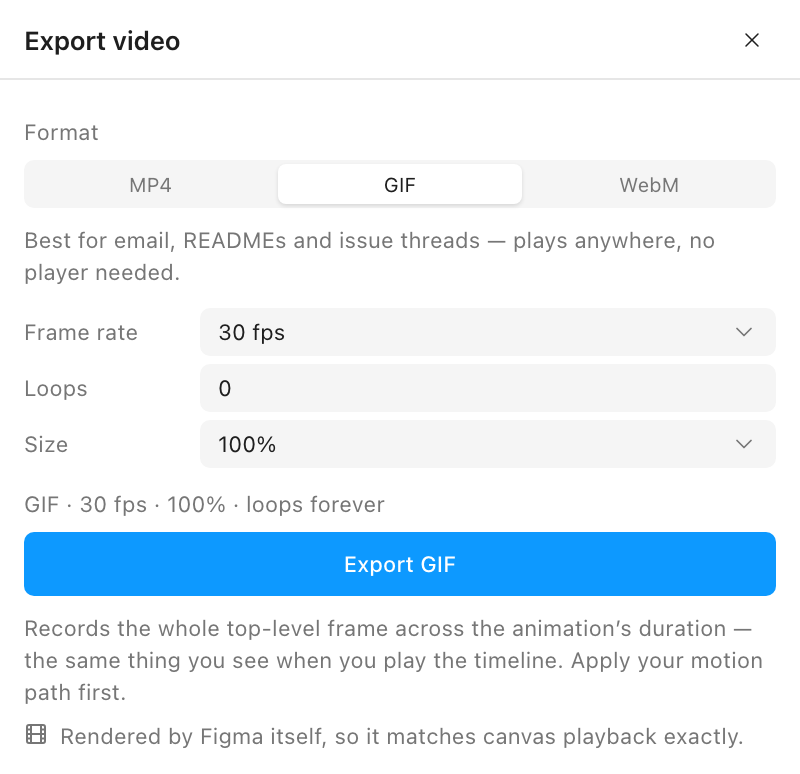
GIF — best for email, READMEs and issue threads. It plays anywhere, with no player needed. Note the Loops field that replaced Quality: leave it at 0 and the GIF loops forever, which is almost always what you want.
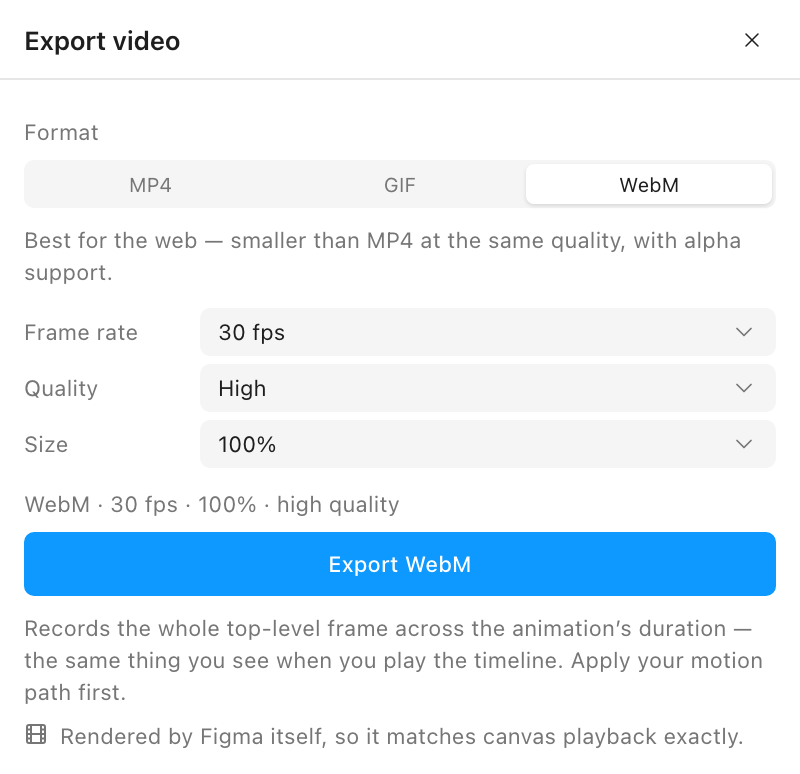
WebM — best for the web. Smaller than MP4 at the same quality, and it supports alpha, so the animation can sit on whatever is behind it rather than on a rectangle of background.
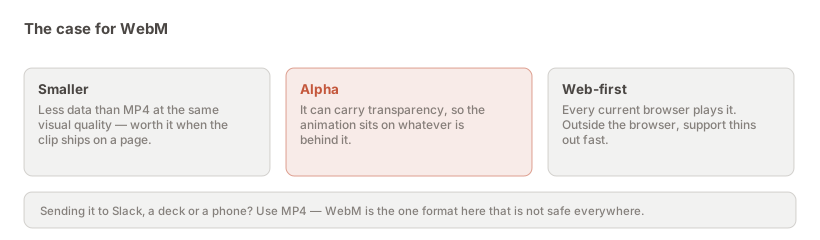
The caveat on WebM is the one people forget. Inside a browser it is excellent. Outside one — a phone’s photo roll, a colleague’s presentation software, a messaging app — support gets patchy fast. If the file is going anywhere other than a web page, send MP4.
Each format accepts a specific list of rates. These are literal unions in the plugin API, so a rate outside the list is not merely inadvisable — it is rejected. The panel only offers legal values, and if you switch format in a way that strands your current rate, it snaps to the nearest legal one rather than silently failing later.
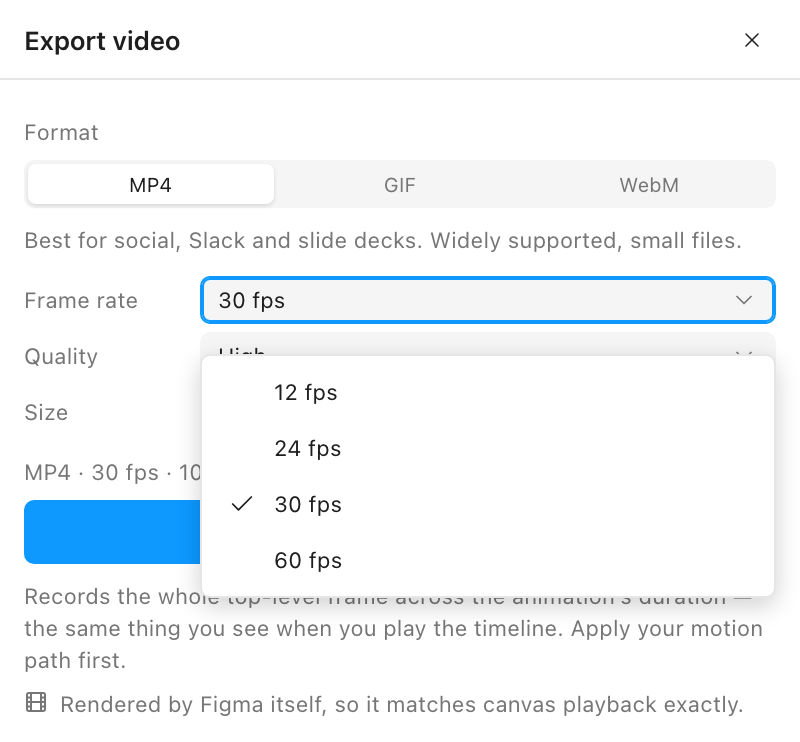
30 is the default and is right for almost everything. 60 is worth it only for fast motion that a viewer will watch closely — it doubles the encoded frames. 12 is a deliberate stylistic choice, not a saving; it reads as stepped animation.
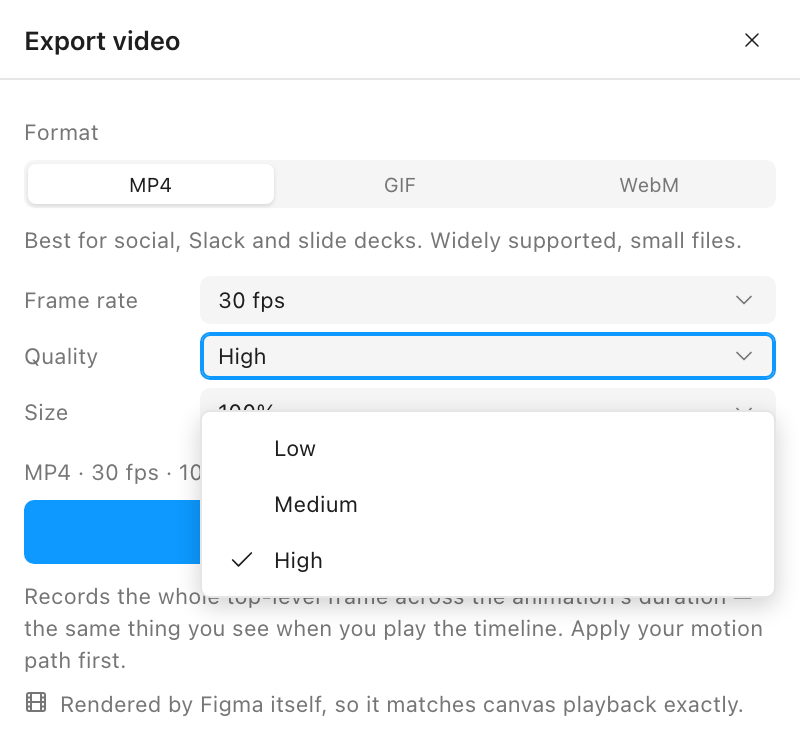
Quality is a preset rather than a bitrate: Low, Medium, High. High is the default. Drop it when the file has to fit a size limit and you would rather lose fidelity than resolution.
Size is a multiplier applied to the frame’s own dimensions, from 50% to 4×.
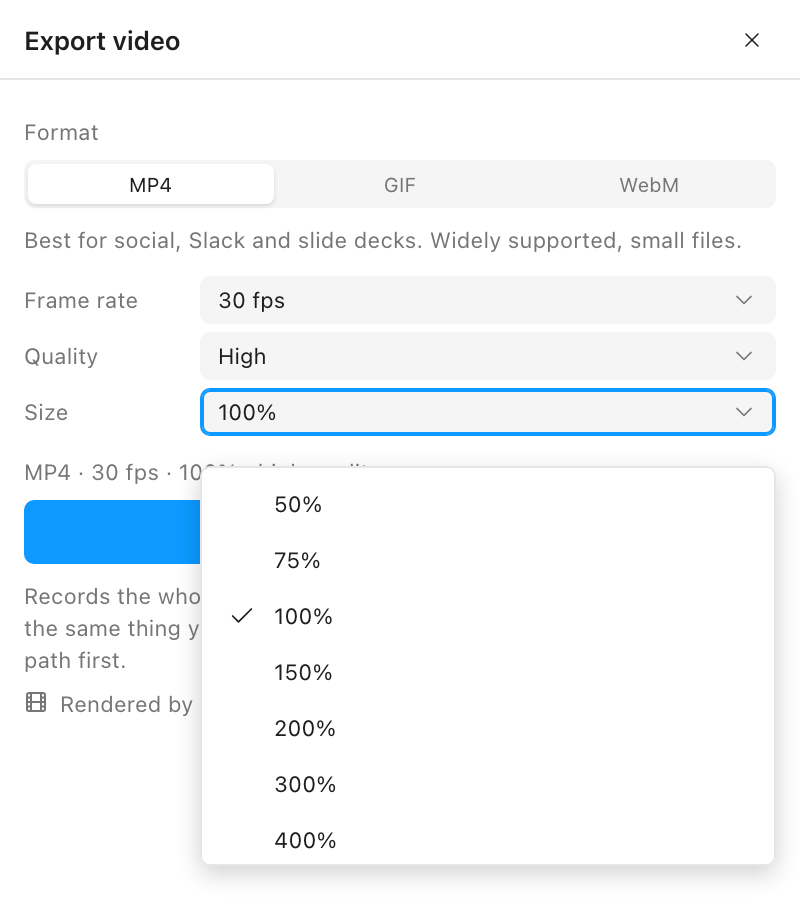
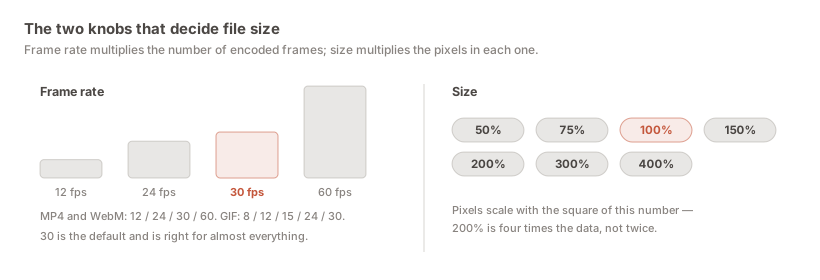
The two knobs compound differently, which is worth knowing before you reach for either. Frame rate multiplies the number of encoded frames — 60 fps is twice the work of 30. Size multiplies the pixels in each one, and it does so quadratically: 200% is four times the data, not twice. If a file is too big, drop the frame rate first; it costs less visually than you expect.
A line under the controls states what you are about to get — MP4 · 30 fps · 100% · high quality — before you commit to the encode. Read it. It is faster than exporting twice.
Press the export button and Figma encodes the frame across the animation’s duration. Larger frames and higher rates take a few seconds; the button reads Rendering… while it works. Nothing on your canvas is touched at any point — this is a pure export.
A video export records the animation’s duration once. Everything about whether it reads as a loop is decided on the Animate tab, before you ever open the export panel — and this is where most disappointing clips come from.
Three settings do the work. Direction chooses forward, reverse or ping-pong; ping-pong is the cheapest way to make a short move feel finished, because the object returns to where it started. Loops repeats the traversal inside the timeline, so a two-second move at three loops gives you six seconds of animation to encode. Seamless matters most: without it, a forward loop teleports back to the start on the final frame, and that jump is exactly what a viewer’s eye catches on a GIF playing endlessly in a README.
The rule of thumb is to make the timeline itself loop cleanly, then export once. Trying to fix a visible seam afterwards, in the encode, is not possible — the encoder faithfully records the seam. Direction, loops and seamless covers the settings properly.
MP4 is the format that asks nothing of anyone. It plays in Slack, in a deck, in a message thread, on a phone, in a browser, with no plugin and no conversation about codecs. It is selected by default and the defaults under it — 30 fps, High, 100% — are right for almost every use. Here is what each field is actually doing.
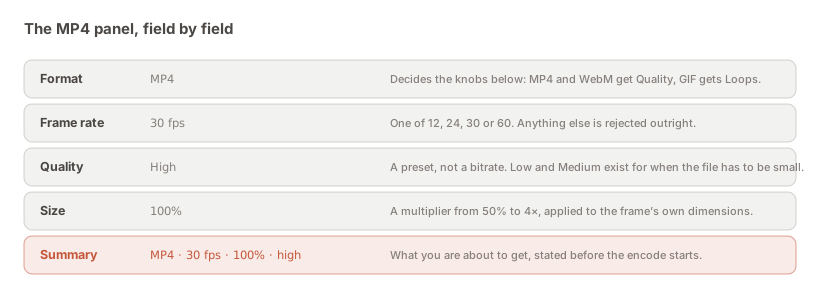
Quality is a preset, not a bitrate. Low, Medium, High. Because Figma is encoding flat vector artwork rather than camera footage, High is cheaper here than the word suggests — large areas of solid colour compress extremely well. Drop it only when you are up against a hard size limit and would rather lose fidelity than resolution.
Size is the field most likely to be misused. It multiplies the frame’s own dimensions, and it looks like a quality control. It is not. Scaling a 100% export up to 200% does not add detail — the source artwork is whatever resolution the frame is. It multiplies the data describing the same picture.
The two knobs compound differently, and the difference matters when a file is too big.
Frame rate scales linearly. 60 fps is twice the frames of 30. Halving the rate roughly halves the work.
Size scales quadratically. 200% is four times the pixel data, not twice; 400% is sixteen times.
So when a file is too heavy, drop the frame rate first. It costs less visually than you expect on short clips, and far less than halving the size would. When you genuinely need a crisper large render, make the frame bigger in Figma and export at 100% — or, if what you want is resolution independence, you do not want a video at all. You want Lottie, which is vector and has no resolution.
An MP4 is pixels over time, and the gaps are invisible until someone downstream needs one of them.
It carries no layer names, no structure and no text you can select or search. It carries no interactivity — a prototype hotspot, a hover state, a scroll trigger all flatten to whatever happened to be on screen. It carries no colour tokens or styles, so nobody can pull a hex value out of it. And it carries no audio, because a Figma timeline has none.
None of that is a defect; it is what “a video” means. The failure mode is treating the MP4 as the handoff rather than as the illustration accompanying one. If the recipient needs any of those things, the MP4 is the covering note, not the deliverable.
The file arrives named by Figma, and if three of them end up in a Slack thread nobody can tell which is which a week later. Name for the decision rather than the settings: checkout-success-v3.mp4 beats export-30fps-high.mp4, because the person looking for it remembers what it showed, not how it was encoded. Where a clip is one of several being compared, numbering them in the order they will be discussed saves a surprising amount of meeting time. And keep the version marker in the name rather than relying on the download timestamp — timestamps survive the download folder, but not being pasted into a document.
Shorter than you think, in almost every case. A clip attached to a Slack message competes with everything else in the channel; a clip in a release email competes with the reader’s inbox. Two to four seconds is usually enough to show a single motion idea, and a viewer will happily watch a short loop three times where they will abandon a ten-second one halfway.
If you have a long sequence, the useful move is usually to export several short clips rather than one long one, each showing one idea. They are easier to caption, easier to replace when one part of the design changes, and far easier for someone to quote back at you in a review.
Duration also interacts with file size more than the settings do. A four-second clip at 30 fps is 120 encoded frames; the same clip at 60 fps is 240. Halving the duration saves more than dropping a quality preset, and costs nothing visually.
A video answers “what should this look like” and nothing else. If the recipient has to build the motion, they need something more, and sending only the clip guarantees a round trip.
For an engineer, send the video and the Lottie — the clip so they can see the intent at a glance without opening anything, the JSON so they can ship it. For a colleague who will rebuild the technique on a different path, send the video and the Config JSON. For a stakeholder who just needs to approve it, the video alone is exactly right, and anything else is noise.
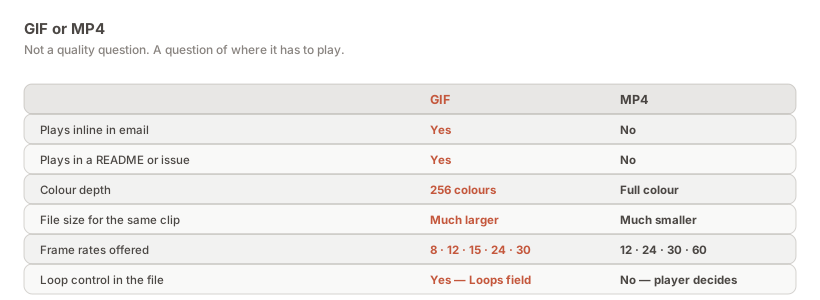
The decision is about where it has to play, not about quality. GIF wins in exactly one place — anywhere that will not run a video element, which in practice means email clients, README files and issue trackers. It pays for that with 256 colours and a much larger file. Everywhere else, MP4 or WebM is smaller and looks better.
And if the animation is going into a product rather than to a person, none of these is the answer. A video cannot be recoloured, resized without loss, paused at 40% while a form validates, or driven by application state. Export Lottie for that.
The panel says which problem it is rather than failing silently, and there are only ever two: nothing is selected, or the selection is not inside a frame with a timeline. Both messages appear where the encoder notes normally sit.
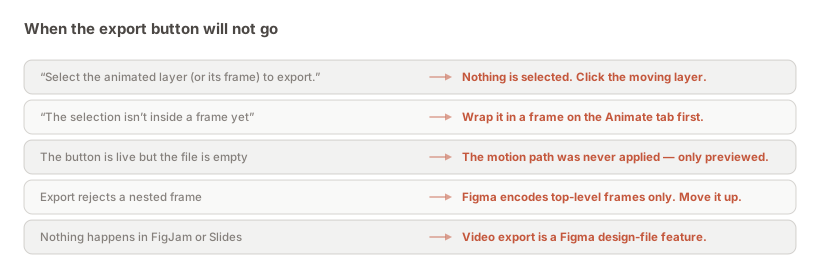
The one that is not an error message is the third: the button is live, the export succeeds, and the file shows a static frame. That is a motion that was previewed but never applied.
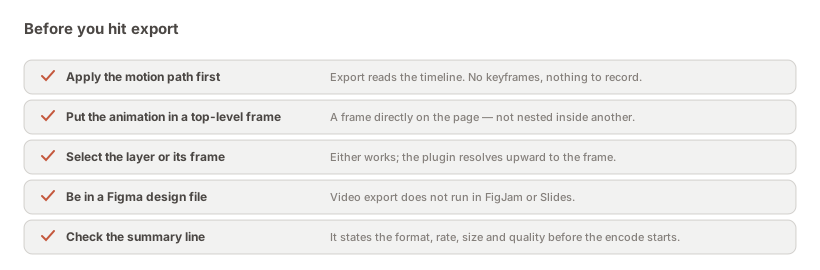
Apply the motion, open the … menu in the Motion Path titlebar, choose Export video, pick MP4, GIF or WebM, set the frame rate and size, and press Export. Figma encodes it and the file downloads.
Figma has the encoder, but it is exposed through the plugin API rather than as a button in the Figma interface, so a plugin has to call it. Motion Path does, passing your settings straight through — the encoding itself is Figma’s.
12, 24, 30 or 60 for MP4 and WebM; 8, 12, 15, 24 or 30 for GIF. These are the values the API accepts, so the panel offers no others. 30 is the default.
The motion was previewed but never applied. The preview runs inside the plugin panel without writing to the canvas; the encoder records the canvas. Press Apply motion path and export again.
Either nothing is selected, or your selection is not inside a frame with a timeline. Select the animated layer — or wrap it in a frame on the Animate tab first — and the button becomes live.
The whole top-level frame, across the animation’s duration — the same thing you see when you play the timeline. If you want a tighter crop, resize the frame rather than the selection.
Apply your motion with Motion Path, open the … menu, choose Export video, and press Export MP4. MP4 is selected by default and the default settings suit most uses.
Shorten the clip first, then drop the frame rate, then drop the quality preset. Reducing the size multiplier is a last resort because it costs resolution — and note the reverse, that raising it costs data quadratically without adding detail.
Not directly. Quality is exposed as Low, Medium and High presets rather than a numeric bitrate, because that is the shape of the underlying API. Frame rate, size and clip duration are the levers that actually move file weight.
MP4 has no loop flag in the file — looping is up to whatever plays it, and most players and social platforms loop short clips by default. If you need a guaranteed loop count baked in, that is GIF, which has a Loops field.
Choose GIF and leave the Loops field at 0. That is the default, and it means infinite. Any other number is a literal repeat count baked into the file.
Yes — WebM supports an alpha channel, so an animation on a transparent frame stays transparent. MP4 does not. Bear in mind that WebM support outside browsers is patchy, so it is a web answer rather than a universal one.
No. Video export only runs in Figma design files. The code exports — Lottie, CSS, SVG and the demo page — do not use the encoder and are unaffected.
Install Motion Path — it’s free → Browse 300+ animation examples